Barcode Scanning
KioskBuddy supports barcode scanning for self-checkout use cases using the front-facing tablet camera, Bluetooth barcode scanner in HID mode, or a USB barcode scanner, in HID mode, plugged into the tablet.
Prerequisites link
Your items must have a SKU assigned to them in your Square Item Library. Don't forget to reimport these changes into your KioskBuddy menu!
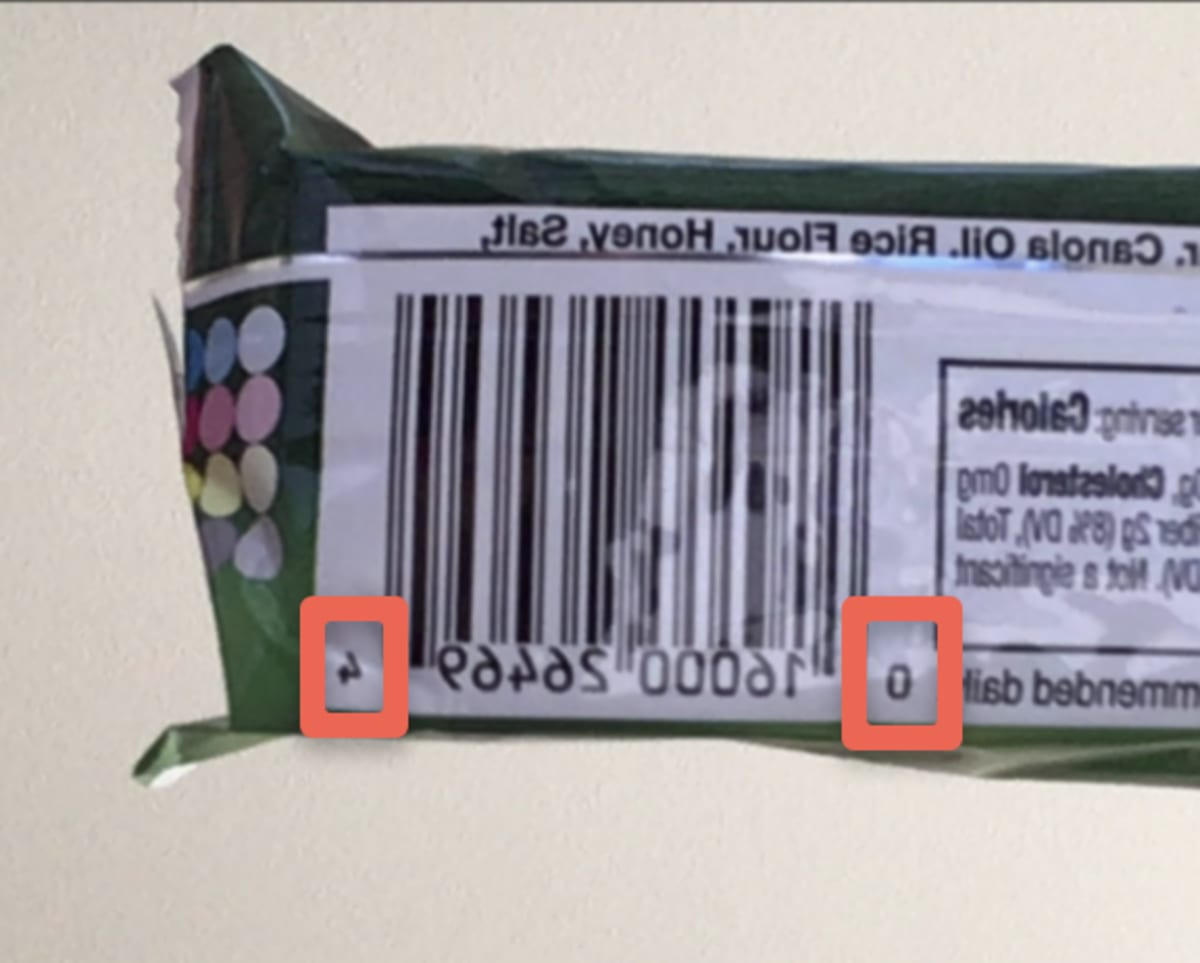
When adding the barcode number into the SKU field in your Square Item Library, make sure you add all the numbers, including the one at the beginning and at the end as shown in the screenshot below with no spaces in between. Check out this help article for more information on barcode formatting.
How to enable barcode scanning using the front-facing tablet camera link
Open the KioskBuddy app.
Ensure you are on the KioskBuddy Configuration Home Screen.
If you are in Kiosk Mode, exit out of Kiosk Mode.
If you are in KDS Mode, exit out of KDS Mode.
Scroll down and find the Optional: Barcode Scanning section, as seen below. If you haven't already enabled camera permissions, you'll be prompted to do so now via the button seen below.

4. Once you have granted KioskBuddy camera permissions, there's only one more thing to do. At this point, you'll want to enable the checkbox seen below, which will turn on barcode scanning for your kiosk.
5. You can now start kiosk mode to see the new feature in action!
When the barcode scanning feature is enabled, your kiosk will have a SCAN ITEMS button in the Cart, as seen below in red.

When a customer taps this button, the front-facing camera will appear, allowing them to hold up a barcode to the camera.

Please note that there are some limitations with the front-facing camera:
1. Curved surfaces - In general, highly curved surfaces are hard for the camera to process properly.
2. Faded or non-black barcodes - If the barcode is too hard to read, the camera will miss the necessary data needed to scan it.
How to enable barcode scanning using a Bluetooth barcode scanner link
KioskBuddy supports Bluetooth barcode scanners using HID mode. HID mode means the scanner will act as a keyboard, typing in scanned barcodes. Typically, the barcode scanner should come with an instruction booklet that includes barcodes to scan for the setup process.
The setup for each barcode scanner will vary depending on the model. The photo below is just an example.

After connecting the barcode scanner to the tablet, there are no additional steps needed to start using it with KioskBuddy. Once an item is scanned, it will automatically be added to the cart.
Please note that by connecting a barcode scanner to KioskBuddy, the input will remain in HID mode. This means that any text fields on the kiosk (e.g. special requests, "text" checkout steps, promo codes) will not automatically display the on-screen keyboard.
How to enable barcode scanning using a USB barcode scanner link

KioskBuddy supports USB barcode scanners plugged directly into the tablet using an adapter. Depending on your device's charging port, you'll need to purchase an adapter that splits a USB-A and charging port (the photo above is an example of a USB-A and USB-C splitter). After connecting the barcode scanner to the tablet, there are no additional steps needed to start using it with KioskBuddy. Once an item is scanned, it will automatically be added to the cart.
Unfortunately, USB barcode scanners plugged into the Square Stand will not be detected by KioskBuddy.
Please note that by connecting a barcode scanner to KioskBuddy, the input will remain in HID mode. This means that any text fields on the kiosk (e.g. special requests, "text" checkout steps, promo codes) will not automatically display the on-screen keyboard.
Testing your scanner's connection link
If you're having a difficult time scanning items and want to rule out a scanner connection issue, simply open up KioskBuddy and head to any "text" area within the app. It can be the "special requests" field, "email", or any other text prompt you've added to your KioskBuddy checkout flow. Click into the text field and scan any barcode. If the scanner is properly connected, you should see the number on the barcode appear into the text field.
Supported and recommended barcode scanners link
Any Bluetooth or USB barcode scanner that supports HID mode is compatible with KioskBuddy. Below is a list of some recommended devices. Feel free to reach out to us if you have any questions on a certain barcode scanner model.
Bluetooth Barcode Scanners
Zebra DS2278 (Bluetooth)
Star Micronics BSH-32B (Bluetooth)
Symcode Wireless Barcode Scanner (Bluetooth)
SocketScan720 (Bluetooth)
USB Barcode Scanners
Please note that using a USB barcode scanner will require an additional adapter. Some USB barcode scanners may not support a lightning adapter. The USB barcode scanners listed here support both lightning and USB-C adapters.
Star Micronics BSH-20U (USB)
Zebra DS2208 (USB)
Adapters for USB Barcode Scanners
Price embedded barcodes link
KioskBuddy supports price embedded barcodes. This is useful for dynamic priced items that are labeled based on their actual weight. Simply set up the barcode in the EAN-13 or UPC-A format with the five-digit price of the item based on its weight. For more information, check out Square's help article on the topic here.
EU/UK barcode considerations link
Many barcodes in the UK and EU have a ">" at the end. You're still able to scan these barcodes with KioskBuddy but when entering the barcode number in Square's SKU field, you'll want to leave out the ">".
